Get Social

Building PHP 7.4 with phpbrew on Ubuntu/Debian Server (Vesta CP)

The task was to install PHP 7.4 on an Ubuntu server (it is also possible on Debian). Vesta CP is used to manage my server and I’ll install PHP 7.4.8 via phpbrew.

Phpbrew pre-setup on Ubuntu/Debian server running Vesta CP

1. Go to /root directory

cd /root

2. Let’s prepare phpbrew for compilation. We will put in an alternative php directory: /usr/local/php

phpbrew init --root=/usr/local/php
  
export PHPBREW_ROOT=/usr/local/php

[[ -e ~/.phpbrew/bashrc ]] && source ~/.phpbrew/bashrc

phpbrew update

3. BUT! First time I tried to build PHP 7.4, I got an error.

Phpbrew build error on Vesta (Debian/Ubuntu) – “No package oniguruma found” (pkg-config)

How to overcome this error?

First, we’ll find and install required, “oniguruma” containing package to satisfy the dependency:

# apt search oniguruma
Sorting... Done
Full Text Search... Done
libjruby-joni-java/oldstable,oldstable 2.1.11-2 all
 Java port of Oniguruma regexp library

libonig-dev/oldstable,oldstable,now 6.1.3-2 amd64 [installed]
 regular expressions library — development files

libonig4/oldstable,oldstable,now 6.1.3-2 amd64 [installed,automatic]
 regular expressions library

libonig4-dbg/oldstable,oldstable 6.1.3-2 amd64
 regular expressions library — debugging symbols

lua-rex-onig/oldstable,oldstable 2.7.2-4 amd64
 Onig regular expressions library for the Lua language

Setup via command:

apt install libonig-dev

Then we’ll edit the build command, taking into account what is written on GitHub:

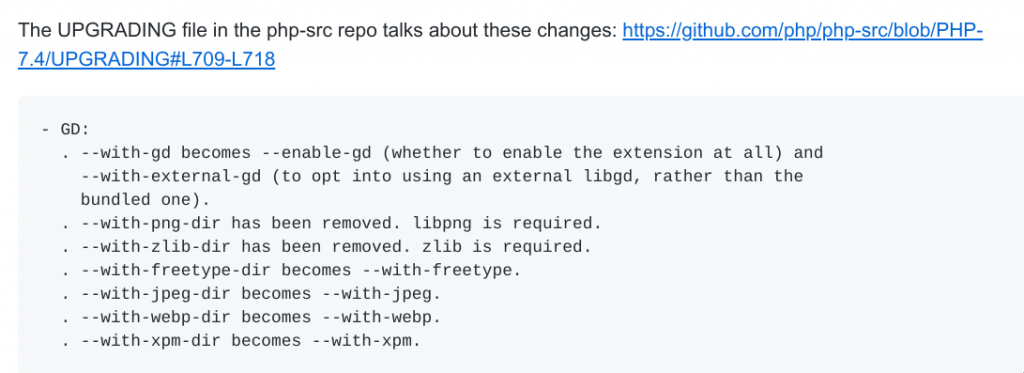
Here is the complete build command:

phpbrew install 7.4 +default +openssl=shared -- --with-openssl-dir=/usr/include/openssl --with-mysql-sock=/var/run/mysqld/mysqld.sock --with-mysql=mysqlnd --with-mysqli=mysqlnd --enable-pdo --with-pdo-mysql=mysqlnd --enable-exif --with-jpeg=/usr --with-freetype=/usr --with-mcrypt=/usr --with-mhash --with-xsl=/usr --enable-zip --enable-cgi --with-curl --enable-gd --enable-pcntl --enable-mbregex --enable-gd-native-ttf --with-libdir=lib64 --enable-dba=shared --enable-intl --with-readline=/usr --enable-simplexml --enable-soap --enable-zip --with-mhash=yes --enable-shmop --enable-sockets --enable-wddx --enable-calendar --enable-sysvsem --enable-sysvshm --enable-sysvmsg --enable-bcmath --with-bz2 --enable-ctype --with-cdb --with-iconv --enable-exif --enable-ftp --with-gettext --with-pic

At the end, we’ll create a symbolic link in order to set up later in Vesta CP configuration:

ln -s /usr/local/php/php/php-7.4.8 /usr/local/php/php74

Free PHP, HTML, CSS, JavaScript editor – Codelobster IDE

In this article, I tell more about free editor of web languages – Codelobster IDE.

Main Features of Codelobster IDE

It is presented on the software market for a long time already, and it wins a lot of fans.

Codelobster IDE allows you to edit PHP, HTML, CSS and JavaScript files, it highlights the syntax and gives hints for tags, functions and their parameters. This editor easily deals with those files that contain a mixed content.

If you insert PHP code in your HTML template, then the editor correctly highlights both HTML tags and PHP functions. The same applies to CSS and JavaScript code, which is contained in HTML files.

The program includes auto-completion function, which greatly speeds up the programmer’s work and eliminates the possibility of errors.

Codelobster IDE provides contextual help on all supported programming languages, it uses the most up to date documentation at this moment, downloading it from official sites. So we can quickly get a description of any HTML tag, CSS attribute, PHP or JavaScript function by pressing the F1 key.

The built-in PHP debugger allows you to execute PHP scripts step by step, sequentially moving through the lines of code. You can assign check points, view the process of the work of loops, and monitor the values of all variables during the execution of the script.

You can view the HTML templates directly in the editor, highlight the interesting elements on the page and explore the associated CSS styles. HTML and CSS inspector works by the principle of all known FireBug.

Other useful functions and features of the IDE:

  • A pair highlighting of parentheses and tags – you will never have to count parentheses or quotation marks, the editor will take care of it.

  • Highlighting of blocks, selection and collapsing of code snippets, bookmarks to facilitate navigation on the edited file, recognition and building of the complete structure of PHP projects – these functions ensure easy work with projects of any scale.

  • Support for 17 user interface languages, among them English, German, Russian, Spanish, French and others.

  • The program works on the following operation systems: Windows 7, Windows 8, Windows 10, Mac OS, Linux, Ubuntu, Fedora, Debian.

The professional version of Codelobster IDE provides the programmer with even more features.

For example, you have an opportunity to work with projects on a remote server with use of the built-in FTP client. You can edit the selected files, preview the results and then synchronize the changes with the files on the hosting.

In addition the professional version includes an extensive set of plug-ins:

  • Fully implemented support for JavaScript libraries, such as jQuery, Node.js, AngularJS, BackboneJS and MeteorJS.

  • A large set of extensions that help to work with PHP frameworks – CakePHP, CodeIgniter, Laravel, Phalcon, Smarty, Symfony, Twig and Yii plug-ins.

  • Plugins for working with the most popular CMS – Drupal, Joomla, Magento and WordPress.

You can download and install any framework directly from the program without being distracted from the main tasks.

Codelobster IDE works fast, does not hang and allows to work even with large PHP projects.

You can download Codelobster IDE from the official website http://codelobsteride.com.

How to configure Let’s Encrypt on the VestaCP admin interface (8083 port) with CA use

It is assumed that you have a valid domain (the so-called FQDN), which you can use to enter the admin area. In my case, OVH provided a free domain of the form ns123456.ip-x-y-z.eu, which means that I can use it to enter the admin area: https://ns123456.ip-x-y-z.eu:8083/

Step-by-step set up Let’s Encrypt on the VestaCP admin panel (8083 port)

Step 1 – create a domain and find let’s encrypt files

First, in the admin panel, create your domain, if it is not already created. You can use the default user – admin, or any other. Include the use of ssl and let’s encrypt – you will get about the same as in the screenshot:

Let’s encrypt generates SSL certificate files and stores them in /home/[USERNAME]/conf/web (/home/admin/conf/web – in my case)

There is file list :

ssl.ns123456.ip-x-y-z.eu.crt
ssl.ns123456.ip-x-y-z.eu.ca
ssl.ns123456.ip-x-y-z.eu.key
ssl.ns123456.ip-x-y-z.eu.pem

2 Step – find where VestaCP stores its SSL files

It is not necessary to search, we simply know, that they is stored here 🙂

/usr/local/vesta/ssl

and files look so:

certificate.crt
certificate.key

You can carefully rename VestaCP old certificate files (although what prevents our simply removing them?):

mv /usr/local/vesta/ssl/certificate.crt /usr/local/vesta/ssl/certificate_old.crt
mv /usr/local/vesta/ssl/certificate.key /usr/local/vesta/ssl/certificate_old.key

These 2 files are set in the form https://ns123456.ip-x-y-z.eu:8083/edit/server/ -> Vesta SSL

3 step – force the Vesta-Nginx service to use SSL from your domain

Now you probably thought – we’ll just create symbolic links and everything will be fine … But …

But did you notice the problem? In the first case, we have 4 files, and although you can not pay attention to .pem – in the first form we have 3 fields: for CRT, KEY and CA, and in the second – only 2: for CRT and KEY.

Let’s Encrypt has a CA file that is reflected in the field: SSL Certificate Authority / Intermediate

How can this be taken into account in the VestaCP admin on port 8083?

I found for myself such a decision:

Make 1 symbolic link for the KEY file:

ln -s /home/admin/conf/web/ssl.ns123456.ip-x-y-z.eu.key /usr/local/vesta/ssl/certificate.key

and in the second case – you can run this command:

sudo cat /home/admin/conf/web/ssl.ns123456.ip-x-y-z.eu.{crt,ca} > /usr/local/vesta/ssl/certificate.crt

{crt, ca} is a regular expression on bash – it will defend you from writing 2 times the path to the file. It is very important that there is such a sequence – first crt, then ca. If you do the opposite – in the end, the vesta service will not work.

4 step – manually restart Vesta CP and check that everything works in the browser

Restart service:

service vesta restart

Open your domain in the browser with port 8083 and now SSL must be “protected”.

Step 5 – add the “certificate.crt” update task to the cron scheduler

We need to add the following task to the cron scheduler:

30 5 * * * sudo cat /home/admin/conf/web/ssl.ns123456.ip-x-y-z.eu.{crt,ca} > /usr/local/vesta/ssl/certificate.crt && sudo service vesta restart

(look at what time the system cron “let’s encrypt update” task works and you’ll see something like this:

15 5 * * * sudo /usr/local/vesta/bin/v-update-letsencrypt-ssl

it is logical, if our task will be carried out later)

Done!

Pages:1234567...14