Get Social

Free S/MIME certificate (comodo secure email)

Of course, honest citizens have nothing to hide. However, you will agree that it is unpleasant when personal or confidential information becomes available to someone else. Modern mail clients support wonderful S/MIME. We can take advantage of this function in order not to send mail on the Internet as postcards.

To do this, we will do the following steps:

[1] You can get free s/mime certificate for your email with this url: https://www.comodo.com/home/email-security/free-email-certificate.php

1

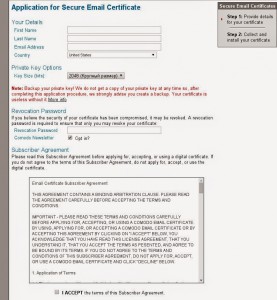
[2] Then carefully fill out the form, come up and remember/write your new recovery password:
2

[3] Then to the specified email address we receive a message with the subject “Confirm Your Subscription to COMODO Information & Newsletter“. The email confirmation link, which in the letter, needs to be opened in the browser in which you initialized the registration. After confirmation, the certificate must be saved in the repository.

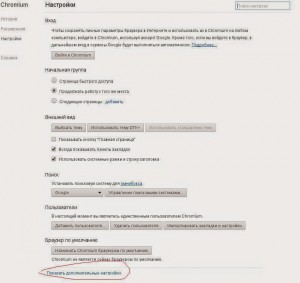
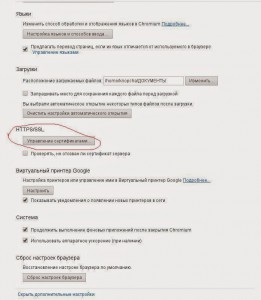
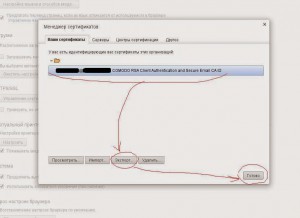
[4] Then in your favorite browser (I have a chromium in the screenshot), you need to extract the received certificate to use it in the mail client:
3    4

[5] As you can see in the pictures, in the settings you need select “show additional settings” and find the “certificate management” section, select the certificate from comodo certificate and export it.

5

Everything, now you can embed in email clients.

p.s. You must export the entire certificate tree, and, possibly, the private key.

Script for domain names monitoring

Script for domain names monitoring image

Often, who have multiple sites, think about – how to control when a domain name renewal term will expire. Especially if domain names are served by different registrars. So it was in the companies where I worked: one and a half to two dozen domain names were always was used. I wanted to find out about domain expiration and pay it on time.

I’ll share the script on Bash, which I sketched for this. In fact, it’s a parser.
What he does, you can understand from the comments, but I will describe a little more:

So the task: the script, runs on a schedule; it check domains; sends email report.

[1] Where do we get data from?

This script uses whois command results. Sometimes console query: “whois some kind of domain” does not give the expected result. This is due to the fact that the whois command does not poll suitable servers that contain complete information. Therefore, we can add such servers to the configuration file whois.conf

[2] How it works?

1. We see an array of domain names that need to be checked (fill it by yourself).
2. Next – create a temporary file, which is beautifully filled with a parser
3. File contents are sent to the mail and the file is deleted.

[3] Source?

Here it is:

#!/bin/bash

## Script for monitoring domain names -> checking domain expiration date
## url: http://rocknroot.pp.ua/en/blog.script-for-domain-names-monitoring.html


# DON'T forget add to /etc/whois.conf:
# \.ua$ whois.com.ua
# \.by$ whois.cctld.by
#(if needed)
# Or place somewhere your whois.conf and specify a parameter to the whois command

export LC_ALL=en_US.utf8

# domain names array for polling
ARR_DOMAIN+=(
yahoo.com
google.com
)

# If there is no possibility to edit whois.conf - then you can try to enter the following
# value in the bash array: '-h whois.cctld.by tut.by' (in quotation marks)

# Create a file for temporary data
echo "" > tmp_file_domain_renew

# Writes table header there 
printf "%-35s\t %-25s\t %-25s\n" "Domain     " "< 50 days" "> 50 days" >> tmp_file_domain_renew
printf "%-35s\t %-25s\t %-25s\n" "---------------" "----------" "----------" >> tmp_file_domain_renew

# Parses information about the validity period of the domain
for DOMAIN_ in "${ARR_DOMAIN[@]}"
 do
 sleep 0.2
 dateexp_=`whois $DOMAIN_ | \
 egrep -i 'Expiration Date:|paid-till:|OK-UNTIL|Domain Currently Expires:|Record expires on|expires:|Registry Expiry Date:'| \
 head -n 1 | \
 sed 's/\(OK-UNTIL\) \(.\{,8\}\).*/\2/i' | \
 sed 's/.*Currently //' | \
 sed 's/.*Expiration Date:/ExpDate: /' | \
 sed 's/.*Registry Expiry Date:/RegExpDate: /' | \
 sed 's/T[0-9][0-9]\:.*//'| \
 awk '{$1=""; print $0}' | \
 sed 's/^\ //' | \
 sed 's/\([0-9]*\)\.\([0-9]*\)\.\([0-9]*\)/\1\2\3/i'`

# Calculate how many days remain from the current date
dateexp_s=`date -d "${dateexp_}" +"%s"`
datenow_s=`date +"%s"`
diff_s=`expr $dateexp_s - $datenow_s`
diff_d=`expr $diff_s / 3600 / 24`

# Fill in the columns of the table, depending on whether
# More or less, in this case, 50 days
if [[ $diff_d -ge 50 ]];
then
  printf "%-35s\t %-25s\t %-25s\n" "$DOMAIN_"  "-" "$diff_d" >> tmp_file_domain_renew
else
  printf "%-35s\t %-25s\t %-25s\n" "$DOMAIN_" "$diff_d" "-" >> tmp_file_domain_renew
fi

done

# send to email
mail -s DomainRenewCheck yourmail@example.com < tmp_file_domain_renew

# cleaning
rm tmp_file_domain_renew

[4] Checking.

Do not forget to make executable with the command:

chmod +x domain_renew.sh

The result should be something like this (in your mailbox):

Domain                          < 50 days               > 50 days                
—————                  ———-              ———-            
yahoo.com                               –                         320                      
google.com                             16                        –                           

[5] How to add schedule task?

Run “crontab -e” in the console and prescribe script path and time when it needs to run.
That’s all. Now it’s a little easier to track when the domain expires. 🙂

Installing Debian Wheezy on an SSD

So, what do we have:

Intel i5-3470
16 Gb DDR3-1600Mhz
60Gb Kingston SSD
1500Gb Samsung Hard Disk

[1] Analysis and preparation

Google search gives the first 3 links to wiki.debian.org
That’s what we need.
The article “SSD Installation” tells that the use of SSD will increase the speed of the system by 200%. This is good news. However, it also shows that there is a problem – a limited number of rewriting cycles.Further explains how to transfer an existing installation to a solid-state drive – this is not what we need, since we will put a clean system on it. Therefore, proceed to the article “SSDOptimization”. Here we get the following recommendations:
– use the kernel version of at least 3.2 (in Debian 7 is just 3.2)
– use the ext4 file system (and select it during installation)

[2] Installing a clean system

At this preparatory stage is over. Now, in any convenient way, we run the Debian Wheezy installation. Having preliminarily read various articles about which I will go further, I decided not to change anything particularly in how logical disks are partitioning, and all the necessary transformations I will make after the installation. Moreover, it would take a lot of time – the main place on the 1.5TB drive is the /home partition on the xfs file system, which does not support the reduction. That is, it would be necessary to transfer more than 1 TB of data somewhere, and then copy again … I will put the operation system on an SSD drive, and then I will make symbolic links for such directories as /var and others that I deem it necessary to place next to /home on the existing HDD.
I will not even install the swap partition.

[3] Setting up and optimizing

So, the system is installed. Further on the links to other articles we find still valuable recommendations.
Thanks https://wiki.archlinux.org/index.php/SSD, http://help.ubuntu.ru/wiki/ssd, and other articles, we can see that the partitions and file systems on the SSD need to be customized. What came in handy for me personally:

-> Let’s check the TRIM support (http://ru.wikipedia.org/wiki/TRIM) (technology that allows to distribute load on SSD)

hdparm -I /dev/sda | grep TRIM
        *    Data Set Management TRIM supported (limit 1 block)
        *    Deterministic read data after TRIM

-> Boot from the LiveCD / LiveUSB and transfer the / var partition from the root located on the SSD to the HDD (the one that is mounted in the home). Then make a symbolic link from /home/var to /var.
This will significantly reduce the number of write cycles on the SSD, since this directory is actively used by operationg system for recording (log files and others…).

-> We also edit /etc/fstab – add the “discard” option (includes use of TRIM) for the root file system, “noatime” (turn off file access time), “nodiratime”

-> I decided to use one more tip – apt cache put to RAM
To do this, add the following line in /etc/fstab:

tmpfs   /var/cache/apt/archives tmpfs   defaults        0       0

In this case, the apt cache will not be stored on harddisk. For reinstalling packages, its can always be downloaded from the network. But it will now be possible to speed up packages installation in a clean system due to the large volume of RAM.

[4] Further analysis

Install utility iotop:

aptitude install iotop

Now you can see which processes are most actively use disk for writing:

iotop -oPa

After that, perhaps, you can think about what other folders can be transfered from application profiles to hdd.

p.s. This configuration has been working since January 2014. There are no problems 🙂