For modesty, I must say that this is in my opinion the best practice at the moment.
Step 1. Preparation: package management – dependencies for build nginx pagespeed
First, you need to check that there is a string in the package sources with “deb-src” for nginx.
Open (or create) target file from sources.list.d/
nano /etc/apt/sources.list.d/nginx.list
You will see something like:
deb http://nginx.org/packages/mainline/ubuntu/ yakkety nginx

deb-src http://nginx.org/packages/mainline/ubuntu/ yakkety nginx
if there is no second line, then you need to add it (just copy the first line and add “-src”)
Update the cache then:
aptitude update
After that, install all the latest updates:
aptitude safe-upgrade
Next, download all the necessary (we have to satisfy all the dependencies) for building nginx from the source code:
apt-get build-dep nginx
Step 2. Downloading and unpacking – nginx source code, module pagespeed incubator, PSOL library
Create a working folder and go into it:
mkdir ~/nginx-with-pagespeed

cd ~/nginx-with-pagespeed
Step 2.1. Nginx source code download
Download the source code of the latest version of nginx:
apt-get source nginx
If you look what’s in the folder, you’ll see something similar:
# ls -lh

total 1.1M

drwxr-xr-x 10 root root 4.0K Jan 9 12:03 nginx-1.13.4

-rw-r--r-- 1 root root 106K Aug 8 20:52 nginx_1.13.4-1~yakkety.debian.tar.xz

-rw-r--r-- 1 root root 1.5K Aug 8 20:52 nginx_1.13.4-1~yakkety.dsc

-rw-r--r-- 1 root root 966K Aug 8 20:52 nginx_1.13.4.orig.tar.gz
Step 2.2. Downloading and unpacking the source code of the pagespeed incubator module
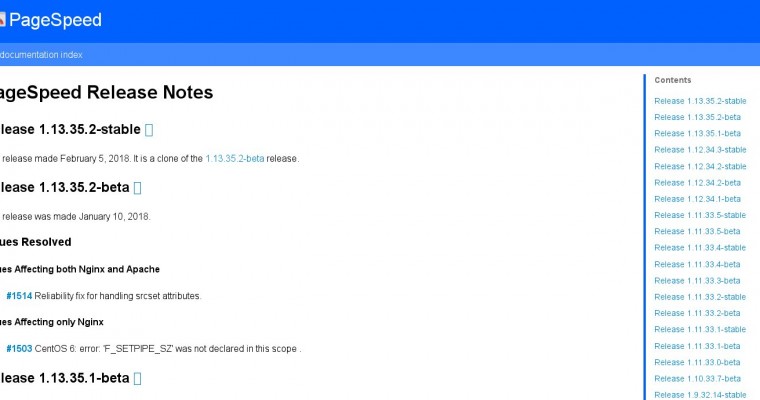
Go to url: https://www.modpagespeed.com/doc/release_notes
and find the last stable release:
(in my case it was: 1.12.34.3-stable)
Now run the next commands:
NPS_VERSION=1.12.34.3-stable

NGINX_VERSION=nginx-1.13.4

wget https://github.com/pagespeed/ngx_pagespeed/archive/v${NPS_VERSION}.zip

cd ${NGINX_VERSION}/src/http/ && unzip ~/nginx-with-pagespeed/v${NPS_VERSION}.zip
Perhaps you will get an error and have to install “unzip”:
apt install unzip
After installing “unzip” do not forget to repeat the last command from the list above.
Step 2.3. Downloal PSOL library
To do this, it’s best to go back to our working folder:
cd ~/nginx-with-pagespeed
Previously, the PSOL library could have been loaded with such a simple command:
wget https://dl.google.com/dl/page-speed/psol/1.12.34.3.tar.gz
However, this error is increasingly encountered:
The file doesn't exist on the server:

https://dl.google.com/dl/page-speed/psol/1.12.34.3.tar.gz

and you can get also:

ERROR 404: Not Found.
In this case, try adding the prefix “-x64” to the name.
Also, if the error recurs – try reducing the last digit by 1.
This command worked (in my case):
wget https://dl.google.com/dl/page-speed/psol/1.12.34.2-x64.tar.gz
go to the folder with unpacked pagespeed:
cd ~/nginx-with-pagespeed/${NGINX_VERSION}/src/http/incubator-pagespeed-ngx-1.12.34.3-stable
and here unpack the psol library
tar -xzvf ~/nginx-with-pagespeed/1.12.34.2-x64.tar.gz
Step 3. Nginx source code modification for pagespeed
Now you need to make edits to 2 files, before you can build the deb package:
Step 3.1. The debian/rules file changes
Open the rules for build:
nano ~/nginx-with-pagespeed/${NGINX_VERSION}/debian/rules
Paste the path to the nginx pagespeed module, which looks something like this:
–add-module=$(CURDIR)/src/http/incubator-pagespeed-ngx-1.12.34.3-stable
In this section:
config.status.nginx: config.env.nginx

cd $(BUILDDIR_nginx) && \
At the very end of the next line (in my case it was 41 lines):
CFLAGS="" ./configure --prefix=/etc/nginx --sbin-path=/usr/sbin/nginx --modules-path=/usr/lib/nginx/modules --conf-path=/etc/nginx/nginx.......
Step 3.2 The debian/changelog file changes
Open changelog file in the editor:
nano ~/nginx-with-pagespeed/${NGINX_VERSION}/debian/changelog
and change the first line, which looks something like this:
nginx (1.13.4-1~yakkety) yakkety; urgency=low
to:
nginx (1.13.4-1~yakkety-pagespeed) yakkety; urgency=low
(that is, add something that indicates the presence of “pagespeed” in this version of nginx)
Step 4. Build and install the nginx deb package with nginx pagespeed incubator
Step 4.1. Build deb package nginx with nginx pagespeed module incubator
Go to the source folder nginx:
cd ~/nginx-with-pagespeed/${NGINX_VERSION}
and begin the build:
dpkg-buildpackage -b
Possible errors when building nginx with the nginx pagespeed module
In general, errors can be caused by a lack of suitable -dev packages in the system. For example, in one of the cases I got this error:
Error: “checking for psol … not found”
configuring additional modules

adding module in /root/nginx-with-pagespeed/nginx-1.13.9/src/http/incubator-pagespeed-ngx-1.13.35.2-stable

mod_pagespeed_dir=/root/nginx-with-pagespeed/nginx-1.13.9/src/http/incubator-pagespeed-ngx-1.13.35.2-stable/psol/include

build_from_source=false

checking for psol ... not found

./configure: error: module ngx_pagespeed requires the pagespeed optimization library.

Look in /root/nginx-with-pagespeed/nginx-1.13.9/debian/build-nginx/objs/autoconf.err for more details.

debian/rules:40: recipe for target 'config.status.nginx' failed

make: *** [config.status.nginx] Error 1

dpkg-buildpackage: error: debian/rules build gave error exit status 2
To fix it, see autoconf.err:
nano /root/nginx-with-pagespeed/nginx-1.13.9/debian/build-nginx/objs/autoconf.err
by the word “psol” we find a detailed description of the error:
checking for psol

/usr/bin/ld: cannot find -luuid

collect2: error: ld returned 1 exit status
The solution is:
aptitude install uuid-dev
Step 4.2. Installing the nginx deb package with the nginx pagespeed incubator module
Check what we got in our working folder after the build:
cd ~/nginx-with-pagespeed && ls -lh

total 17M

drwxr-xr-x 10 root root 4.0K Jan 9 20:25 nginx-1.13.4

-rw-r--r-- 1 root root 106K Aug 8 20:52 nginx_1.13.4-1~yakkety.debian.tar.xz

-rw-r--r-- 1 root root 1.5K Aug 8 20:52 nginx_1.13.4-1~yakkety.dsc

-rw-r--r-- 1 root root 1.1K Jan 9 20:25 nginx_1.13.4-1~yakkety-pagespeed_amd64.changes

-rw-r--r-- 1 root root 4.2M Jan 9 20:25 nginx_1.13.4-1~yakkety-pagespeed_amd64.deb

-rw-r--r-- 1 root root 966K Aug 8 20:52 nginx_1.13.4.orig.tar.gz

-rw-r--r-- 1 root root 11M Jan 9 20:25 nginx-dbg_1.13.4-1~yakkety-pagespeed_amd64.deb

-rw-r--r-- 1 root root 146K Jan 9 12:14 v1.12.34.3-stable.zip
To install the nginx compiled with the pagespeed module, run the command:
dpkg -i nginx_1.13.4-1~yakkety-pagespeed_amd64.deb
Now we can check the version of Nginx:
nginx -V

nginx version: nginx/1.13.4

built by gcc 6.2.0 20161005 (Ubuntu 6.2.0-5ubuntu12)

built with OpenSSL 1.0.2g 1 Mar 2016

TLS SNI support enabled

configure arguments: --prefix=/etc/nginx --sbin-path=/usr/sbin/nginx --modules-path=/usr/lib/nginx/modules --conf-path=/etc/nginx/nginx.conf --error-log-path=/var/log/nginx/error.log --http-log-path=/var/log/nginx/access.log --pid-path=/var/run/nginx.pid --lock-path=/var/run/nginx.lock --http-client-body-temp-path=/var/cache/nginx/client_temp --http-proxy-temp-path=/var/cache/nginx/proxy_temp --http-fastcgi-temp-path=/var/cache/nginx/fastcgi_temp --http-uwsgi-temp-path=/var/cache/nginx/uwsgi_temp --http-scgi-temp-path=/var/cache/nginx/scgi_temp --user=nginx --group=nginx --with-compat --with-file-aio --with-threads --with-http_addition_module --with-http_auth_request_module --with-http_dav_module --with-http_flv_module --with-http_gunzip_module --with-http_gzip_static_module --with-http_mp4_module --with-http_random_index_module --with-http_realip_module --with-http_secure_link_module --with-http_slice_module --with-http_ssl_module --with-http_stub_status_module --with-http_sub_module --with-http_v2_module --with-mail --with-mail_ssl_module --with-stream --with-stream_realip_module --with-stream_ssl_module --with-stream_ssl_preread_module --with-cc-opt='-g -O2 -fdebug-prefix-map=/root/nginx-with-pagespeed/${NGINX_VERSION}=. -fstack-protector-strong -Wformat -Werror=format-security -Wp,-D_FORTIFY_SOURCE=2 -fPIC' --with-ld-opt='-Wl,-Bsymbolic-functions -Wl,-z,relro -Wl,-z,now -Wl,--as-needed -pie' --add-module=/root/nginx-with-pagespeed/${NGINX_VERSION}/src/http/incubator-pagespeed-ngx-1.12.34.3-stable
Step 5. Protecting from updates – Nginx package with the pagespeed incubator module
To prevent Nginx from being updated with future updates, it is best to prevent automatic updating of the Nginx package. This can be done in 2 ways:
Step 5.1. Lock in Aptitude (“Hold”) – Nginx package with the pagespeed incubator module
In the terminal, run aptitude, then find “nginx” and press “=” on it (or ctrl + T, then “Hold” in the drop-down menu).
Step 5.2. Lock in Apt (“Pin”) – Nginx package with the pagespeed incubator module
If you do not use aptitude, then you can do so:
Create a new file for nginx in the /etc/apt/preferences.d folder:
nano /etc/apt/preferences.d/nginx
Then paste the following lines into it:
Package: nginx

Pin: version 1.13.4-1~yakkety-pagespeed

Pin-Priority: 1001
Be sure to verify that the name of your package and Nginx versions are appropriate.
Step 6. Configuring – Nginx with nginx pagespeed incubator
In general, you can create ngx_pagespeed_cache directory, where the cache will be stored, for example, in the /var folder:
mkdir -p /var/ngx_pagespeed_cache

chown -R www-data:www-data /var/ngx_pagespeed_cache
and directly configure the module to add to the virtual host file
(e.g., /etc/nginx/conf.d/example.com)
However, in the case where the Vesta CP control panel is installed on the server, it is better to configure it in next way:
Open the configuration file of the virtual host, where they are usually located under the control of Vesta CP. It could be something like:
nano /home/admin/conf/web/snginx.conf
or
nano /home/USER/conf/web/example.com.apache2.ssl.conf
We need to find a similar directive:
include /home/admin/conf/web/snginx.example.com.conf*;
Now, in accordance with it, create a new file, where we add the settings of the module pagespeed:
nano /home/admin/conf/web/snginx.example.com.conf_pagespeed
Here is a sample (remember that all paths to files need to be changed to their own):
## Pagespeed Settings

pagespeed on;

pagespeed FileCachePath /home/admin/web/example.com/ngx_pagespeed_cache;

pagespeed ImageRecompressionQuality 95;

pagespeed HttpCacheCompressionLevel 0;

pagespeed Disallow "*.svg";

#

# Ensure requests for pagespeed optimized resources go to the pagespeed handler and no extraneous headers get set.

location ~ "\.pagespeed\.([a-z]\.)?[a-z]{2}\.[^.]{10}\.[^.]+" { add_header "" ""; }

location ~ "^/ngx_pagespeed_static/" { }

location ~ "^/ngx_pagespeed_beacon" { }
Check the config:
nginx -t
Done, you can restart Nginx:
service nginx restart
It’s all!


